Hay farming plays a vital role in supporting livestock and maintaining sustainable agriculture. To ensure a productive and efficient operation, farmers must rely on a wide range of specialized equipment designed for each stage of the hay production process.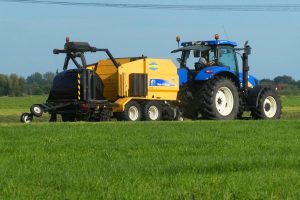
From cutting and raking to baling and storing, having the right tools can dramatically increase yield and reduce labor time.
Whether you’re a beginner farmer or expanding your operation, understanding the Equipment Needed For Hay Farming will boost efficiency and profitability.
This guide will explore the essential equipment needed for hay farming, focusing on how each machine contributes to the process. Let’s dive into the best and most important equipment used in modern hay production
20 Best Equipment Needed For Hay Farming
1. Soil Tester
A soil tester is used before planting to check pH and nutrient levels. It helps farmers avoid costly mistakes when amending soil. Proper testing leads to stronger hay stands.
By identifying deficiencies early, you can apply lime or fertilizer accurately. This reduces waste and maximizes yield potential. Testing regularly ensures consistent results.
Early testing also improves soil health over time. It saves long-term money and labor. Investing in a tester pays off quickly.
Pros:
-
Accurate readings
-
Saves fertilizer
-
Portable tool
-
Quick results
-
Guides planning
-
Boosts yield
-
Helps budgeting
Cons:
-
Needs calibration
-
Battery‐powered
-
Might misread
2. Tractor
A tractor is the core machine in hay production. It powers all major attachments from plows to balers. Without it, operations stall.
Choose a tractor with sufficient horsepower for your field size. This ensures smoother, more efficient workflows. It will reduce manual labor drastically.
Tractors improve daily productivity and save time. They’re versatile for many farming stages. A solid tractor is essential for profitability.
Pros:
-
Multi‑purpose
-
Saves labor
-
Powerful pull
-
Long lifespan
-
Fuel‑efficient
-
Attachments fit
-
High resale
Cons:
-
High cost
-
Fuel expense
-
Needs upkeep
3. Plow
A plow turns the soil and buries old crop remnants. This cultivates a strong base for hay seeds. It also reduces weed competition early on.
Using a plow improves soil aeration and drainage. It breaks compact ground for better root growth. Good plowing ensures consistent stands.
Despite being heavy tool, it’s vital for soil prep. It promotes healthy crops year after year. Skipping it leads to poor harvests.
Pros:
-
Breaks soil
-
Kills weeds
-
Improves drainage
-
Preps for seeds
-
Strong roots
-
Increases yield
-
Tractor‑compatible
Cons:
-
Diesel‑powered
-
Heavy tool
-
Over‑tillage risk
4. Harrow
Following plowing, the harrow smooths and levels the ground. It also breaks clods and covers seeds after planting. This promotes even germination.
Harrowing helps manage surface weeds and improves soil structure. It boosts soil-to-seed contact. The result is a uniform field.
It’s fast and efficient across large acreage. Using a harrow reduces rework later. Skipping this step may cost you yield.
Pros:
-
Levels soil
-
Covers seeds
-
Reduces weeds
-
Boosts germination
-
Lightweight
-
Tractor‑drawn
-
Saves time
Cons:
-
May clog
-
Needs speed
-
Surface only
5. Seed Drill
A seed drill ensures precise depth and seed spacing. It increases germination rates compared to broadcast planting. It also reduces seed waste.
Using a drill makes stands uniform and predictable. Consistent spacing simplifies later operations. It helps produce dense, quality hay.
Although pricier than manual methods, it’s worth the investment. It saves seed and boosts establishment success. Consistent plant density enhances yields.
Pros:
-
Precise planting
-
Saves seeds
-
Fast sowing
-
Uniform rows
-
Easy setup
-
High yield
-
Reduces waste
Cons:
-
Expensive
-
Needs tractor
-
Rocks disrupt
6. Fertilizer Spreader
A fertilizer spreader distributes nutrients evenly across the field. This encourages vigorous grass growth. It reduces patchiness and deficiencies.
Using it after seeding promotes strong early development. It also maintains fertility throughout the season. Well-fed hay means higher quality.
Adjustable settings help customize application rates. This prevents overuse and environmental harm. It makes fertilizing efficient and effective.
Pros:
-
Even spread
-
Time saver
-
Reduces waste
-
Adjustable settings
-
Tractor‑mounted
-
Disease resistance
-
Boosts yield
Cons:
-
Rust risk
-
Needs cleaning
-
Calibration needs
7. Irrigation System
An irrigation system provides consistent water supply during dry spells. It helps maintain hay quality and density. Without it, production may suffer.
Options like drip or sprinkler suit different budgets and needs. Scheduling helps reduce stress on plants. Water management significantly impacts yield.
Although it requires upfront investment, returns come through improved growth. It’s essential in arid regions. Proper maintenance ensures longevity.
Pros:
-
Steady watering
-
Increases yields
-
Automatable
-
Water‑efficient
-
Reduces stress
-
Field‑scale
-
Enhances quality
Cons:
-
High setup
-
Closes drains
-
Clogs possible
8. Mower
A mower cuts mature hay precisely at the right height. It ensures uniform stems, preserving nutrients. Proper cutting kickstarts the harvesting process.
Customers prefer evenly cut, high-nutrient hay. An efficient mower reduces damage to regrowth. Adjust blade height for optimal quality.
While blades require sharpening, the time saved is significant. Mower-conditioner combos improve drying too. Clean cuts contribute to marketable hay.
Pros:
-
Fast cutting
-
Clean edges
-
Height adjust
-
Durable blades
-
Saves time
-
Tractor‑powered
-
Field consistency
Cons:
-
Blade wear
-
Fuel cost
-
Maintenance
9. Hay Conditioner
A hay conditioner crimps stems to accelerate drying. This saves hours of sun exposure. It also reduces mold risk significantly.
Conditioning immediately after mowing is effective. It flattens stems and exposes moisture. This enhances drying speed.
Though pricier, it’s ideal for wet climates. It helps reduce field time. Quality hay relies on proper drying.
Pros:
-
Speeds drying
-
Reduces mold
-
Saves nutrients
-
Durable rollers
-
Cuts labor
-
Field‑efficient
-
Enhances value
Cons:
-
Costly
-
Prep needed
-
Adds weight
10. Rake
A rake gathers cut hay into windrows for baling. It also turns hay to dry evenly. Proper raking boosts harvest readiness.
Choosing the correct rake type matters—rotary, wheel, or bar. Raking reduces mold and uneven drying. It helps maintain bale-forming consistency.
Although it adds a field pass, the payoff is drier hay. It streamlines baling and storage. Poor raking can nullify prior steps.
Pros:
-
Organized rows
-
Dries evenly
-
Preps for baling
-
Time-efficient
-
Tractor‑drawn
-
Less manual
-
Field-ready
Cons:
-
May tangle
-
Requires control
-
Needs adjustment
11. Tedder
A tedder fluffs hay to improve airflow through windrows. It’s essential in humid or damp conditions. Good tedding prevents mold buildup.
This tool is used after mowing and before raking. It spreads hay evenly and dislodges moisture pockets. It enhances field drying.
Though labor-intensive, the results are worth it. Healthier hay avoids spoilage. Tedder use makes a big drying difference.
Pros:
-
Boosts airflow
-
Speeds drying
-
Reduces clumps
-
Durable parts
-
Tractor‑compatible
-
Saves time
-
Mold‑prevention
Cons:
-
Fuel use
-
Dusty field
-
Needs handling
12. Baler
A baler compacts dried hay into transportable bales. Round balers suit large areas; square balers are stacking-friendly. It is a cornerstone harvest machine.
Baling comes after drying is complete. The right bale density maintains shape and quality. Mechanized baling is fast and consistent.
Affordable balers vary by farm size. Proper upkeep ensures longevity. Reliable bales are key to sales and storage.
Pros:
-
Speed harvest
-
Compact storage
-
Uniform shape
-
Field‑efficient
-
Durable build
-
Versatile use
-
Increases resale
Cons:
-
High cost
-
Mechanics needed
-
Training required
13. Bale Wrapper
A bale wrapper seals moisture-protected bales in stretch wrap. It’s critical for silage and long-term durability. It preserves nutritional quality.
Using wrappers after baling locks in quality and reduces spoilage. Wrapped bales resist rain and UV breakdown. This boosts market value.
Although it adds expenses, returns come through quality. Wrappers are easy to operate. Clean storage depends on proper sealing.
Pros:
-
Moisture lock
-
Nutrient shield
-
UV protection
-
Silage‑ready
-
Easy use
-
Clean storage
-
Reduces spoilage
Cons:
-
Plastic cost
-
Film disposal
-
Extra time
14. Bale Spear
A bale spear helps lift heavy round bales safely. It attaches to a tractor’s loader. It allows easy movement of large bales.
Spears prevent damage compared to dragging. They speed bale stacking and loading. Improved handling reduces labor strain.
Despite being simple, it’s essential. It’s cost-effective and strong. Don’t underestimate handling tools.
Pros:
-
Easy lifting
-
Safe handling
-
Fast work
-
Tractor mounting
-
Durable steel
-
Reduces labor
-
Compact frame
Cons:
-
Needs loader
-
Only rounds
-
Balance risk
15. Bale Trailer
A bale trailer moves harvested bales quickly and safely. It attaches behind a tractor or truck. It allows multi-bale transport in one trip.
Trailers reduce field labor significantly. They simplify offloading and delivery. Industrial or DIY trailers both work.
While it needs storage space, the efficiency is worth it. Make sure lights and tires are maintained. Trailers speed post-harvest logistics.
Pros:
-
High capacity
-
Saves time
-
Low labor
-
Strong frame
-
Fast delivery
-
Durable design
-
Controllable load
Cons:
-
Needs space
-
Tow car required
-
Higher cost
16. Moisture Meter
A moisture meter ensures hay is dry enough to bale or store. It helps prevent mold or heating risks. Ideal moisture is below 20%.
Meters can be handheld or probe style. They give instant readings in windrows or bales. This avoids costly spoilage later.
Inexpensive but vital, this tool ensures safety. It supports reliable, quality hay. Always keep your meter calibrated.
Pros:
-
Instant reading
-
Prevents loss
-
Saves hay
-
Portable
-
Easy to use
-
Durable
-
Affordable
Cons:
-
Calibration needed
-
Probe wear
-
Battery life
17. Net Wrap
Net wrap binds bales quickly and tightly. It provides better bale integrity than twine. It’s fast and reduces leaves loss.
Applied right after baling, net wrap enhances bale shape and stability. It resists weather and handling stress. This leads to safer storage.
Though wrap costs more, it pays in quality. It prevents loose bales. Net-wrapped hay is market-friendly.
Pros:
-
Strong bind
-
Fast wrapping
-
Better coverage
-
Durable
-
UV‑resistant
-
Easy removal
-
Leaves intact
Cons:
-
Wrap cost
-
Equipment needed
-
Entanglement risk
18. Hay Elevator
A hay elevator lifts bales into storage lofts or stacks. It reduces manual lifting dramatically. It’s essential for multi-level barns.
Powered or manual, it handles vertical movement effectively. Elevators speed up stacking and loading. They prevent injuries.
Though you need storage space, elevators save back strain. They’re especially useful in large barns. Hire a model that matches your bale weight.
Pros:
-
Saves labor
-
Stacks high
-
Speeds loading
-
Easy to use
-
Reduces injury
-
Efficient design
-
Great reach
Cons:
-
Needs power
-
Setup needed
-
Bulky size
19. Storage Barn
A storage barn shelters hay from weather and pests. Good ventilation prevents moisture buildup. This preserves nutritional quality.
Barns also improve resale value. Proper layout makes handling easier. It protects investment year-round.
Building one costs upfront but pays off. It minimizes spoilage and loss. A well-designed barn is key infrastructure.
Pros:
-
Weather safe
-
Pest barrier
-
Durable build
-
Ventilated
-
Easy access
-
Maintains quality
-
Long lifespan
Cons:
-
Big expense
-
Requires land
-
Needs permits
20. Loader Attachment
A loader attachment boosts a tractor’s versatility. It helps lift bales, move equipment, or load trailers. It’s useful beyond hay farms too.
Loaders reduce manual effort in stacking and handling tasks. They make farms more efficient. Multi-use attachments save investment.
Be sure the loader matches your tractor capacity. Training ensures safe use. Proper use extends its life and your productivity.
Pros:
-
Heavy lifting
-
Multi-tool use
-
Fast operations
-
Loader-ready
-
Compact design
-
Safe work
-
High utility
Cons:
-
Tractor wear
-
Training needs
-
Costly add-on
Equipment Needed For Hay Farming FAQs
1. What are the top tools for hay farming?
The top tools are tractor, mower, and baler—they handle every main stage economically.
2. How do I cut and dry hay?
You use a mower, then conditioner, tedder, and rake for consistent drying. Baling comes after.
3. Can I skip soil testing?
Skipping tests risks crop failure. A soil tester saves money. Always test first.
4. Why wrap hay?
Wrapping protects hay from moisture and pests. It ensures quality during storage. Wrapping preserves nutrients.
5. Round or square bales?
Round bales are fast and field-friendly. Square bales stack easily. Choose based on your storage/bale handling needs.
6. Do I need a moisture meter?
Yes! A moisture meter prevents mold and fire risk. It’s cheap but essential.
7. Is a barn necessary?
Yes, to protect hay from weather year-round. A barn is a long-term investment. It preserves value.
Conclusion
Using the correct equipment in the proper order of operations ensures superior results for hay farming. From soil testing to loader use, each tool supports the production of healthy, market-ready hay. Investing wisely in this complete toolkit boosts yields, saves labor, and improves quality.
Plan your tool purchases across seasons for smooth implementation. Maintain them regularly to extend their lifespan.
With the right machinery, you’ll not only produce hay — you’ll make haymaking profitable, sustainable, and scalable. Ready to upgrade your hay farming setup? Start now with one key tool, and grow from there!
Recent Posts
Choosing the best compost for lawn top dressing is essential for achieving a thicker, greener, and healthier lawn that performs consistently throughout the year. High-quality compost improves soil...
Choosing the best bagged compost for vegetable garden success is one of the most important decisions for improving soil fertility and maximizing crop yield. High-quality compost not only enriches the...